Recent Posts

DIY Guide: Making & Shaping Bread Rolls (+ Tasty Recipe)


Bread rolls are a good way to develop your home bread-making skills and are a versatile side dish which can be used for sandwiches, burger buns or alongside a stew or soup.

In this post, I’m going to show you step by step how to make, shape and bake soft bread rolls which you can make to impress your friends and family.

I’ll also include my step-by-step video and ways that you can use various washes and toppings to achieve different effects depending on how you plan to use the rolls.

So, let’s get started with the recipe and then read on to find out more about how you can take a basic soft bread roll to the next level.
image of homemade bread rolls

How to make and shape soft bread rolls

ea1fd500d07d9b74bb1b0d9c0e007eb6?s=30&d=mm&r=gRachel Jones
Step by step recipe to make soft white bread rolls
5 from 1 vote
Prep Time 35 minutes
Cook Time 20 minutes
Rising time 3 hours
Total Time 3 hours 55 minutes
Course Bread
Cuisine Worldwide
Servings 8
Calories 258 kcal

Equipment

  • Large mixing bowl
  • Dough scraper
  • Baking trays
  • Parchment paper
  • Digital scales
  • Measuring jug

Ingredients
  

Instructions
 

  • Weigh the strong white flour into the large mixing bowl
  • Add the salt and the yeast to the flour, keeping them seperate in the bowl
  • Make a well in the flour and add the softened butter and honey (optional)
  • Add the milk and water which should be just tepid and around room temperature
  • Mix the ingredients together to form a dough and knead for around 10-15 minutes and until the dough becomes strong and glossy (see video to see what this looks like)
  • Place the dough in the mixing bowl, cover and leave it to rise for at least an hour or until the dough has at least doubled in size

Shaping the rolls

  • Once the dough has risen fully, scrape it onto a lightly floured surface gently flatten it out to about 1 inch thick and into a rough square shape
  • Using a dough scraper or knife cut the dough in half and then divide each half into four
  • Separate each section of dough and roll the dough into a ball shape one by one, tucking the dough underneath itself to form a smooth top and any seams are underneath (see video)
  • Line the baking tray with a sheet of baking parchment and place the rolls onto the tray leaving space for them to rise (you might need two trays)
  • Leave the rolls to rest and prove for at least an hour until they've risen up nicely into good sized round rolls
  • Preheat the oven to 200°C/392°F
  • You may want to eggwash and or add a seed topping to you rolls at this point (see below for more information)
  • Bake the bread rolls in the oven until golden brown and until they sound hollow when tapped – don't worry if they seem a bit crispy at this point, they will soften as they cool
  • Leave the rolls to cool on a wire rack and then serve

Nutrition

Sodium: 515mgCalcium: 9mgVitamin A: 94IUSugar: 1gFiber: 2gPotassium: 71mgCholesterol: 8mgCalories: 258kcalSaturated Fat: 2gFat: 4gProtein: 8gCarbohydrates: 46gIron: 1mg
Keyword Bread rolls, Burger buns, Dinner rolls
Tried this recipe?Let us know how it was!

TIP: Not sure if you have all the necessary bread baking equipment at home? Check out my recommended picks below (Amazon links):

More Ways to Experiment with This Bread Roll Recipe

Read on to find out more ways you can adapt the basic bread roll recipe by experimenting between crispy and soft rolls, different flour types, egg washing, topping with seeds and how you can get them to stick to the rolls.


The Difference Between a Crusty Roll and a Soft Roll

I’ve experimented with various milk to water ratios and the ratio in this recipe is a good texture which is soft and not dense, because too much milk can produce a heavy roll.

The recipe on this page will produce a soft white roll with a slightly chewy crust. This texture can be achieved by using milk in the recipe along with some butter.

The fat in the butter along with the milk will help to produce a softer texture with a thinner crust which is perfect for a roll which you want to fill and is great for burgers.

The rolls are also baked at a slightly lower temperature than bread would normally be baked at, which helps to prevent the rolls from going too crispy.

They will feel slightly crispy when they’re removed from the oven, but don’t worry because they will soften up as they cool.

If you are looking to make a crispier roll, you can achieve this by tweaking the process as follows:

  • Replace the milk in the recipe with the same amount of water (370ml in total)
  • Reduce the butter to 20g
  • Up the oven temperature to 220°C/428°F
  • Spray the rolls with some water before baking and consider adding steam to the oven.

What Flour Can You Use for Bread Rolls

You don’t just have to use strong white flour to make bread rolls, although it is important that you use strong bread flour (12% or more protein content) to ensure the dough rises. Alternative flour types you could use are:

  • Strong wholemeal bread flour
  • Any very strong bread flour such as flour made from Canadian wheat
  • White or wholemeal spelt flour
  • Granary or malted bread flour

Keep in mind that if you’re using wholemeal flour or a very strong flour with higher protein levels the flour will absorb more liquid, so you may need to up your liquid total to around 350ml.

Flour which contains the wholegrain will also continue to absorb liquid throughout the kneading process so don’t worry if it seems sticky to begin with.


How to Egg Wash Bread Rolls

Egg washing bread rolls is a great way to add more interest to the look at the roll and will produce a shiny, glossy and golden looking roll.

This effect works well with both sweet and savoury rolls and is really easy to do, here’s how you can egg wash a bread roll:

  • After proving the shaped rolls and when they’re ready to go in the oven;
  • Break an egg into a small cup or bowl and whisk with a fork.
  • Using a pastry brush, gently brush the top of the roll with the beaten egg taking care not to go too far down the sides as the egg will make the rolls stick and could prevent them from rising in the oven.
  • Bake as normal following the recipe instructions.

What Do Egg Washed Rolls Look Like?

The image below shows a roll which has been egg washed (on the left) vs a roll with no wash (on the right).
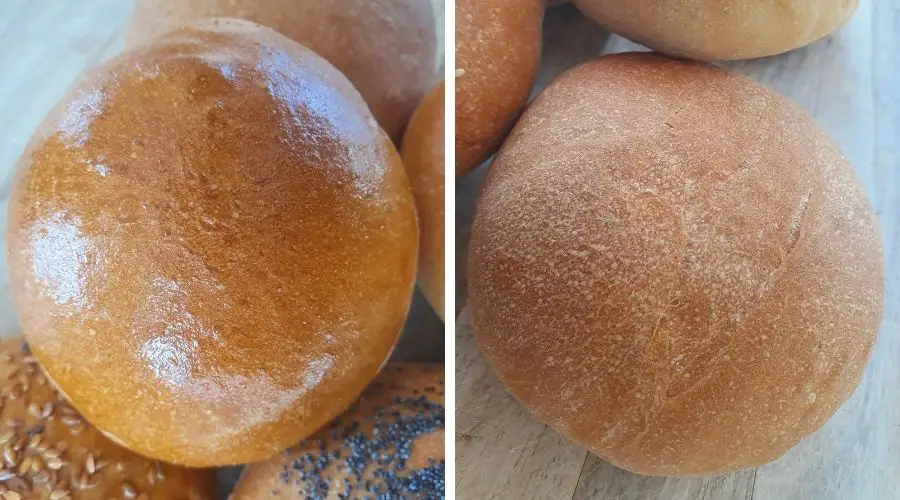
Image of an egg washed roll vs a roll which isn't egg washed

What Can You Use Instead of Egg Wash?

If you don’t want to use an egg wash, you can brush the top of the rolls with some full-fat milk instead. The effect won’t be as effective as it is with an egg wash but it helps to make the rolls more golden.

Another method you could try is brushing with a little melted butter, but take care not to let it burn in the oven.


What Seeds Can You Use On Top of Bread Rolls

The table below shows some ideas of different seeds and other toppings you can use for topping bread rolls and what type of bread roll they work well with:

Seed/topping typeWorks well on
Sesame seedsWhite burger buns
Flax seedsWhite or brown burger buns and dinner rolls
Poppy seedsWhite dinner rolls
Pumpkin seedsBrown or wholemeal dinner or sandwich rolls
Mixed seedsAll types of roll
OatsGood for Granary or malted style rolls
AlmondsGood for sweet buns along with icing

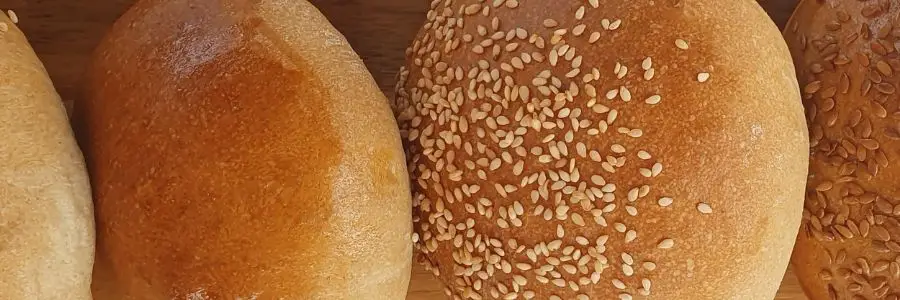
The image below shows an example of rolls with added flax seeds with egg wash (left), sesame seeds with milk wash (centre) and poppy seeds with a water wash (right).
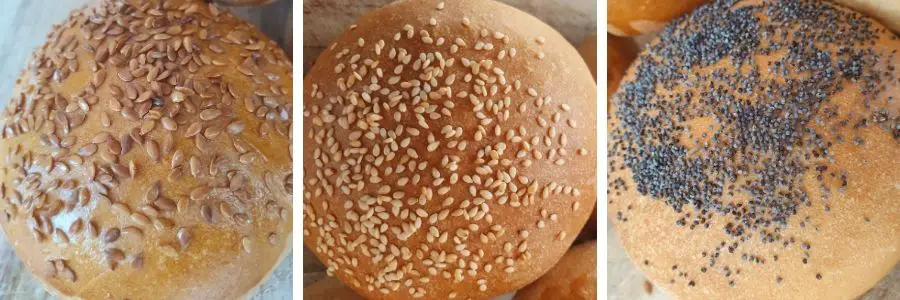
Image of different seed top rolls including flax, poppy and sesame

How to Get Seeds To Stick to Bread Rolls

As you can see from the image above I’ve experimented with different ways to stick seeds on the top of bread rolls, here are the results of the best way to stick seeds to the rolls:

  • Egg wash provides the best glue for all sizes of seeds and creates a glossy look too.
  • Milk holds seeds well and helps to create a golden look to the roll underneath.
  • Water also works well for lighter seeds such as sesame and poppy if you don’t want to use egg or dairy, but is not so reliable for heavier seeds such as pumpkin.

You might also like…

I hope this post has given you some tips on how to make bread rolls more interesting, you might also find the following article helpful:

What is Dough Proving (proofing) and How to do it Properly

GUIDE: Spraying Water On Bread Dough Before Baking


I’ve just covered using steam to bake bread in the oven, so I just wanted to do a quick post on spraying water on bread before baking along with the benefits of spraying with water and how you can use this process throughout the dough making process. So, what are the benefits of spraying dough with water before it goes in the oven?

Spraying water on bread dough before baking helps to keep the top of the dough moist during the first few minutes of baking which in turn helps the dough skin to be more flexible and to expand as it starts to cook. Added moisture also helps to create a crispier crust, especially if used in conjunction with steam baking.

Read on to find out more about other ways a water spray can be used in bread making and how it can help to improve the outcome of your bake.

What does spraying water on bread dough do?

Spraying dough before its baked in the oven can help in the following ways:

  • As above, spraying water over the dough just before the bread is baked will create a flexible crust which expands in the oven.
  • Water and steam help to produce bread with a nice sheen and a bubbly effect where the water evaporates on the bread.
  • A crust which is exposed to water when it’s first baked will be thicker and crispier than bread which hasn’t been exposed to water in the oven.

Using a water spray and steam to bake bread

Although spraying dough with water is good for creating more flexibility in the outer skin, it’s not actually a good way to generate steam in inside the oven.

If you’re looking to achieve a crispy and golden crust I would recommend using steam as well as a spray on top of the dough for maximum effects.

Steam works in a similar way to a water spray in that it helps to achieve a good final rise inside the oven, but on a bigger scale if it’s done in the right way.

I’ve written a full post on using steam to bake bread which you might find helpful, click via the link below:

What does steam do to bread in the oven

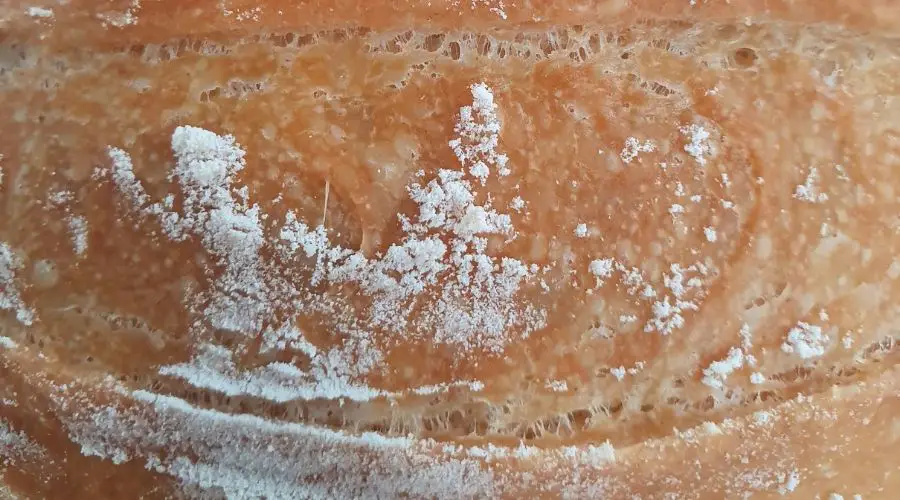
The image below shows a close up of a loaf which has been baked in the oven using a water spray and steam. As you can see, the dough looks crispy and has a bubbly effect along with a shiny golden colour.

Image of dough baked with steam

What spray bottle can you use for baking?

You can use any clean spray bottle to spray water onto the dough, providing they’re clean and have never been used to contain anything toxic I like these multipurpose glass sprays which are available from Amazon (Amazon Affiliate link see privacy policy for more info).

q? encoding=UTF8&ASIN=B08QRBJ7MN&Format= SL250 &ID=AsinImage&MarketPlace=US&ServiceVersion=20070822&WS=1&tag=loafybread05 20&language=en USir?t=loafybread05 20&language=en US&l=li3&o=1&a=B08QRBJ7MN

Using a water spray to stop dough drying out while rising or proving

Having a water spray is also useful for other bread-making tasks, including:

  • Spraying the top of the dough before leaving it to rise and or prove if it’s a hot day and there’s a chance the top of the dough could start drying out.
  • Spraying your hands with a little water to stop the sticky dough from sticking to your fingers.
  • Using a light spray of water instead of an egg wash to help seeds stick to the dough.

If you’re shaping a dough which has a high liquid content and you don’t want to add more flour to stop it sticking, then a water spray can be a really good way to stop the dough sticking to your hands.

TIP: Not sure if you have all the necessary bread baking equipment at home? Check out my recommended picks below (Amazon links):


Should you spray sourdough with water before baking?

Spraying sourdough with water and using steam is a really good way to bake and finish sourdough so that it looks the best it possibly can along with a tasty and crispy crust.

The artisan process of sourdough is a slow one, but very rewarding, so getting the very best finish as the bread bakes is really worth the extra little bit of effort.


You might also like…

I hope this article has helped you find out more about the benefits of spraying dough before it’s baked. You might also find the following post helpful:

Bread Making Tips For Beginners –  Everything You Need to Know

Complete Guide: What Does Steam in the Oven Do For Bread?


You see a lot of celebrity chefs using steam in the oven when they bake bread, but they don’t always fully explain the difference between bread which is baked with steam vs bread baked in a dry oven.

I’ve put together this post to explain exactly what steam does in the oven, how it can make a difference to the outcome of the bread and find out if it’s something which home-bakers should even bother doing? So, what does steam do?

The main purpose of using steam in the oven to bake bread is to help the bread dough expand as it bakes. Steam creates a moist environment which keeps the outer crust of the loaf softer for longer and therefore allowing it to expand before it firms up. Steam also helps to create a shiny loaf with a bubbly effect on the crust.

I’ve recently done some testing with different ways in which you can add steam to the oven to find out which works, read on to find out more about the best way to use and create steam when baking bread.


The Full Story on What Steam Does For Bread

Bread is normally baked at a high temperature (of around 220°C/428°F or above) which can very quickly seal the outer crust of the loaf.

By creating a steamy environment within the oven, instead of making the outer crust harden up straight away it keeps it moist for the first part of the bake and allows the crust to expand.

This allows one more push for a rise in the oven on top of the work you’ve done in proving the dough before baking.

Using steam in the will produce a loaf of bread which has a crispy crust with a bubbly looking texture along with a shinier look than a loaf which is baked in a dry oven.

Below is a close up a loaf I recently made using steam so you can see the bubble effect I’m talking about. It’s this added texture which helps to take your bread up a level.

Image of dough baked with steam

How to Steam Bake Bread

For the purpose of this article, I have tested some different ways to create steam in the oven including:

  1. Placing a deep tray filled water in the bottom of the oven before it’s heated up.
  2. Adding boiling water to a cold baking tray and placing it in a pre-heated oven before placing the bread in the oven.
  3. Pouring boiling water into a preheated tray in a pre-heated oven.
  4. Using various tray sizes to hold the water.

I’ve found the best way to create maximum steam which has the biggest impact on the appearance of the bread is by following the steps below:

  • Place a large (deepish) baking tray into the bottom of the oven – the grill tray which usually comes with an oven and slides in and out between the racks is best.
  • Once the oven is up to temperature pour boiling water into the tray (enough so it doesn’t all evaporate).
  • Immediately place the bread into the oven, shut the door and leave it closed while it bakes.

If you follow this process take care when you pour in the boiling water because it will instantly cause steam to rise up towards your hands and face, so you’ll need to stand back and wear a good pair oven gloves.

It’s this sudden blast of boiling water and steam which really seems to make a difference when compared to water which is just heated up in the oven.

TIP: Not sure if you have all the necessary bread baking equipment at home? Check out my recommended picks below (Amazon links):


What Else Can You Do to get More Rise in the Oven

Using steam to bake bread is a great way to get a final rise into the bread before the crust completely firms up, but there are some other things which you can do before baking to make sure you can get the best rise possible, including:

  • Making sure the dough has been allowed enough time to prove.
  • Using a good yeast which isn’t stale.
  • Using the best bread flour you can get with a high protein level.
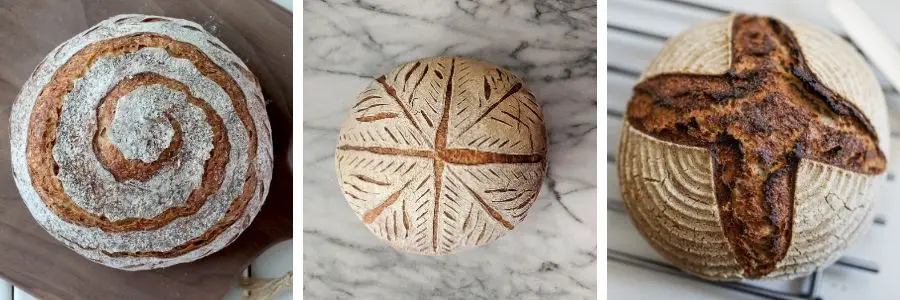
  • Slashing or scoring the dough before it’s baked to allow further expansion.

Slashing (or Scoring) the Dough Before You Bake with Steam

Slashing (or scoring) dough before its steam baked in an oven is a great way to get added boost and a final push before the crust firms up.

Dough slashing and baking with steam are a combination which works well together because both processes help to boost the final rise.

The groves made in the dough also give the crust more texture and crunch which again work well with steam baking.

sourdough pattens

Using Steam to Prevent Bread Burning

Along with helping bread to rise and to produce a crispy crust steam creates a moist atmosphere in the oven which can help to prevent the bread burning or going to dark as it bakes.

Instead, the bread will develop a rich golden colour which all helps to add to the ‘artisan look’.

Because bread is usually baked at a very high temperature adding steam to the oven can be a great way for beginners to gain confidence by creating a loaf that is baked and crispy without worrying about burning so much.


When Should You Not Use Steam to Bake Bread?

Steam is best used for bread recipes where you want to achieve a crispy crust. So for soft bread recipes such as sandwich loaves, soft rolls and milk bread, I wouldn’t recommend steam baking.

If you’re looking to bake bread with a thinner crust adding some fat such as butter or oil and or some milk so replace some of the water content can help to achieve this effect.

Baking Bread Without Steam

Baking bread without steam also works perfectly well, but it can look a bit plain on top, here are a few ideas on how you can make the crust look good without steam:

  • If you’re looking to achieve a shiny top without creating steam an egg wash is a good way to get a golden and glossy crust (depending on the bread type).
  • It’s also good to slash the dough too for the rise, extra texture and just to make the bread look more pretty. Although this doesn’t work for all recipes such as ciabatta or bread rolls.
  • Brown bread recipes work really well with a sprinkle of seeds which you can stick on using a spray of water, milk or egg wash. The seeds brown in the oven and create a really deep nutty flavour and added texture.
  • Dust lightly with flour before you bake, but not too much because it can burn and go dark.
Image of bread rolls baked without steam

Allowing Steam to Escape Once it’s Baked

If you’re using steam in your oven to bake bread it’s still important to make sure steam can escape from the underside of the bread as it cools.

Bread which is left on a flat surface after it comes out of the oven will become soggy underneath because the steam has nowhere to go, so it’s important to cool it on a wire rack where the steam can escape.

Does a Home-Baker Need to Steam Bake Bread?

Whether or not you use steam in the oven to bake bread is entirely up to you, bread-making is such a varied and experimental process that it really is a case of – what works for the baker.

I really like the effect which steam creates along with the crispy crust, so if I’m making a cob, bloomer or crusty tin, I like to use steam, but sometimes I don’t bother.

If you’ve not tried using steam before, I would recommend giving it a try so you can compare the difference – just don’t forget the gloves!


You might also like..

I hope this post has helped you to understand more about how to steam bake and when you do and don’t need to bake with steam.

You might also find the following posts helpful:

Spraying water on bread dough before baking

How to score or slash bread and why we do it

DIY GUIDE: Making Bread Without a Mixer or Bread Machine


If you always use a mixer or a bread machine to make bread it can be easy to stick to that method without ever learning to make bread by hand.

You may be put off trying to make bread by hand because it seems too complicated, too messy or too time-consuming when actually it can be pretty rewarding.

Making bread by hand is something we as humans have been doing for thousands of years and it’s only very recently that we’ve started introducing the machine element in home baking.

I don’t want to come across as preachy about not using machines, because I do use a stand mixer sometimes and I also make bread by hand, it really depends on how busy I am and what I’m making.

The stand mixer can be a great help for kneading when you don’t have much time and you need to multitask also the bread maker has it’s place if you want homemade bread without the prep time.

It’s not cheating, it’s just your choice, but knowing how to make bread by hand is a great skill to have and you’ll always have your hands as a back up if the machine stops working!

In this post I want to show you is how easy making bread by hand can be if you want to have a go without the help of a mixer or bread machine along with tips on how you can do the bits the machine would normally do with minimal fuss.


Making Bread By Hand – Step by Step

The recipe below is an easy way to start making bread by hand, I’ve included a video to show you how to mix and knead bread and you may also find it helpful to read Bread Making Tips For Beginners –  Everything You Need to Know.

Image of handmade white bread

Handmade white bread

How to make bread by hand without a mixer or bread machine
5 from 1 vote
Prep Time 25 minutes
Cook Time 30 minutes
Rising and proving time 3 hours
Total Time 3 hours 55 minutes
Course Bread
Cuisine Worldwide
Servings 12 Thick slices
Calories 170 kcal

Equipment

  • Large mixing bowl
  • Dough scraper
  • Baking sheet
  • Parchment paper to line tin

Ingredients
  

Instructions
 

  • Weigh the flour into a large mixing bowl
  • Add the salt and yeast keeping them separate in the bowl
  • Make a well in the flour and add the softened butter
  • Add the water to the well in the flour
  • Using your hand, gently bring the dry ingredients into the wet and work around the bowl to incorporate the mixture (see video)
  • Once the dough is formed, scrape it out of the bowl and onto a lightly oiled surface
  • Knead the dough by hand for around ten minutes until the dough is glossy and passes the windowpane test (see video)
  • Once kneaded, move the dough back to the mixing bowl, cover and leave to rise until its at least doubled in size.

Shape and prove the dough

  • Knock back and shape the dough – see the video below on how to do this.
  • Place the dough on a baking sheet lined with parchment paper and leave to prove (Proof) again for one hour or until doubled in size.
  • When the dough has nearly completed it's second prove, preheat the oven to 230°C/446°F
  • Once the dough has proved (proofed), slash it on the top using a serrated knife or bread lame 3 or 4 times to help the bread to expand as it bakes in the oven (see link below).
  • Add steam to the oven (optional – see below for full instructions)
  • Bake for around 25 to 30 minutes and until the loaf is crusty and a rich golden brown.
  • Cool on a wire rack and then enjoy!

Nutrition

Sodium: 343mgCalcium: 6mgVitamin A: 62IUSugar: 1gFiber: 1gPotassium: 47mgCholesterol: 5mgCalories: 170kcalSaturated Fat: 1gFat: 3gProtein: 5gCarbohydrates: 30gIron: 1mg
Keyword Handmade bread
Tried this recipe?Let us know how it was!

TIP: Not sure if you have all the necessary bread baking equipment at home? Check out my recommended picks below (Amazon links):

Tips For Getting Even Better Results From Handmade Bread

When you make homemade bread the right way it’s going to be amazing, but you can do a few more things to take it up to the next level.

The two things which I just want to expand on from the recipe above are slashing dough and creating steam.

If you can incorporate these techniques into your recipe, you will see the difference when your bread comes out of the oven.

Slash the Dough Before It Goes in the Oven

Slashing dough isn’t just decorative, it helps the dough to expand further when it bakes in the oven and helps to create texture to the crust.

I had some disastrous results from slashing when I first started using this technique which resulted in collapsed dough because I’d ripped all the air out of the dough.

So over time I’ve learned some techniques which helped me get good results every time, these are:

  • Always use a sharp serrated knife or a good bread lame to prevent the dough snagging and collapsing.
  • Don’t press your hands on the dough, just lightly place your hand on the dough when you slice.
  • Be confident and quick when you slice.
  • You don’t need to go too deep, a maximum of around 1/2 cm is fine.

For a visual guide, have a look at my YouTube video here on how to slash dough.

Create Steam in the Oven

Creating steam in the oven helps the dough to expand as it bakes along and will result in a crispy almost bubbly looking crust texture.

I’ve tested a few different ways of creating steam, but the best way by far is to place a deep baking tray (ideally the grill tray which slides between the racks) in the oven before pre-heating and once the oven has heated up, carefully pour boiling water into the tray.

This will create instant steam, so place the bread in the oven straight away.

It’s really important to wear oven gloves and to stand back from the steam because it will rise up quite aggressively as soon as the water hits the tray.


You might also like…

Why not have a try at making your own homemade bread by hand without a machine, it’s a really relaxing hobby and you get something tasty at the end too.

If you’re looking for more tips and techniques, you might find it helpful to read the following posts:

Bread making tips and techniques

How to Make Bread Dough Rise More Every Time

Dough or Bench Scraper: How to Use It While Making Bread


When you think of bread making equipment these days the dough (or bench) scraper is probably one of the most popular. All of the celebrity bakers use one and you can even get them branded, but do you really need a dough scraper and what can you use instead if you don’t have one?

While the dough scraper is not essential for making bread, it’s a very useful bread-making tool which can be used for various tasks during the bread-making process, including:

  • Scraping dough out of bowls
  • Scraping dough up from work surfaces
  • Cutting and dividing the dough into sections
  • Easily removing excess flour and dough from work surfaces when clearing up after bread making

Read on to find out more about dough scrapers, including what you can use them for, what you can use as an alternative to a dough scraper, the best types and where to buy one.


How You can Use a Dough Scraper For Making Bread

Scraping dough from bowls

Even when you oil bowls the dough will tend to stick to the mixing bowl during mixing and rising, scraping the dough out with a dough scraper helps to get it all out without any mess.

Using the scraper, you can simply scrape the dough directly from the bowl and on to an oiled or floured surface with minimal mess.

Using scraping dough up from work surfaces

A dough scraper is really useful when it comes to kneading dough especially if the dough is on the sticker or wetter side. Using the scraper as you knead helps to lift the dough from the surface as you work it.

Being able to easily lift the dough also means you don’t have to flour or oil the surface so much, which is helpful as added flour can dry out the dough.

Cutting and dividing the dough into sections

If you’re making bread rolls, pizza or any type of bread where the dough needs to be divided, then the dough scraper can also be used for this job too.

The scraper will easily cut through the dough and some also have a measure on them so you can divide it up in equal portions.

Easily removing excess flour and dough from work surfaces

Before I bought a dough scraper I ruined many a dishcloth trying to wipe up excess flour and any dough stuck to the work surface. The flour and dough just sticks to the cloth in clumps and it becomes unusable.

With a dough scraper, you can scrape up all of the flour and debris from the work surface and then it just needs a final wipe with a soapy cloth.

TIP: Not sure if you have all the necessary bread baking equipment at home? Check out my recommended picks below (Amazon links):


Plastic vs Metal Dough Scrapers

Although both plastic and metal versions are both helpful tools when it comes to bread making, there are a few differences.

Plastic scrapers are more flexible and most have rounded edges which makes them really good for scraping-out bowls. They can also be used for lifting dough from work surfaces, cutting and dividing dough and clearing up flour and dough.

Metal scrapers are sturdier and are especially good for cutting, dividing and measuring dough along with scraping dough from a work surface. They are not so good for scraping dough from bowls because they’re inflexible and have a straight edge.

Protecting your work surfaces

If you have work surfaces which damage easily such as composite, then I would recommend using a plastic scraper over a metal one. I have composite surfaces and I get along fine only ever using a plastic scraper.

If I need to measure the dough to divide it up into portions for rolls or pizza, I just use a ruler or weigh each section using digital scales.


Which Are the Best Dough Scrapers For Making Bread

Below are the dough scrapers I recommend in both plastic and metal, all are available from Amazon – click on the images below to check the current prices.


Decora 2 pack of plastic scrapers

q? encoding=UTF8&ASIN=B017R62XJU&Format= SL250 &ID=AsinImage&MarketPlace=US&ServiceVersion=20070822&WS=1&tag=loafybread05 20&language=en USir?t=loafybread05 20&language=en US&l=li3&o=1&a=B017R62XJU

These quality plastic dough scrapers are perfect for all bread-making tasks including bowl scraping and cutting dough. They come in a two-pack making them excellent value for money. Check the current Amazon price for Decora dough scrapers here.


Vouge plain plastic scraper

q? encoding=UTF8&ASIN=B00237UYDG&Format= SL250 &ID=AsinImage&MarketPlace=US&ServiceVersion=20070822&WS=1&tag=loafybread05 20&language=en USir?t=loafybread05 20&language=en US&l=li3&o=1&a=B00237UYDG

This dough scraper is a good budget version, suitable for many bread-making tasks and which is a useful addition to a bread-making kit. Check the current price of the vouge scraper on Amazon here.


OXO Multipurpose dough/bench scraper

q? encoding=UTF8&ASIN=B00004OCNJ&Format= SL250 &ID=AsinImage&MarketPlace=US&ServiceVersion=20070822&WS=1&tag=loafybread05 20&language=en USir?t=loafybread05 20&language=en US&l=li3&o=1&a=B00004OCNJ

This dough/bench scraper is perfect for most bread-making tasks, especially cutting and portioning due to the measurements on the side. Not so good for bowl scraping as it has no rounded edges. Check the current price of this dough/bench scraper on Amazon here.


Can You Use a Dough Scraper For cakes?

Dough scrapers are really useful for cake making and decoration, below are just a few ways a scraper can help with cake-related tasks:

  • Scraping cake batter, frosting, cream etc from mixing bowls cleanly and without waste.
  • Levelling off cake batter in tins before baking.
  • Smoothing frosting and other cake toppings across the top and sides of a cake.
  • Spreading melted chocolate.

What Can You Use Instead of a Dough Scraper?

Bread scrapers are pretty cheap to buy, but if you need to improvise, here are a few ideas on what you can use instead:

  • A clean and unused wallpaper scraper – if you happen to have one hanging about in your DIY kit.
  • Cut a scraper shape with rounded edges out of a sturdy plastic tub or container – making sure there are no sharp edges.
  • A palette knife works well for scraping dough and other baking tasks.
  • A sturdy spatular or a flat fish slice with no holes can become do some dough scraper tasks.

You might also like…

I hope this post has helped to help you decide if you need a dough scraper in your bread-making kit along with some creative ways you can use one.

You might also find the following pages useful:

What equipment do you need to make bread?

Find bread making tools and ingredients

Complete Cost Breakdown: Is Making Your Own Bread Cheaper?


In this article, I want to fully explore the full facts and provide you with true figures on how much it actually costs to make your own bread at home. Including a breakdown of ingredient costs (of varying quality) and how much it costs to bake a loaf of bread in an oven.

I know how much most things cost when it comes to bread making, but I’ve never actually broken down all of the costs to work out exactly what a homemade loaf costs.

I’m interested to know, what you get in the shops for the same price as a homemade loaf using quality ingredients and what is the absolute cheapest loaf you can make and how does that compare to the cheapest bread you can buy.

We all know that homemade bread tastes nicer, but is it actually cheaper to make your own bread or should you just stick to shop-bought?

For the purpose of this article, I’m using UK prices, if you’re not based in the UK it still may be helpful to read to see how you can work out the costs in your local currency.

I’m also going to assume anyone baking a homemade loaf already has very basic baking equipment which is sufficient to bake a loaf, such as a baking tray or bread tin and a large mixing bowl.

So let’s begin!


The Cost of Bread Ingredients Per Loaf

To work out the cost of each ingredient per loaf I’m going to base it on the following simple bread recipe which will produce a large loaf:

  • 500g white, brown or speciality strong bread flour
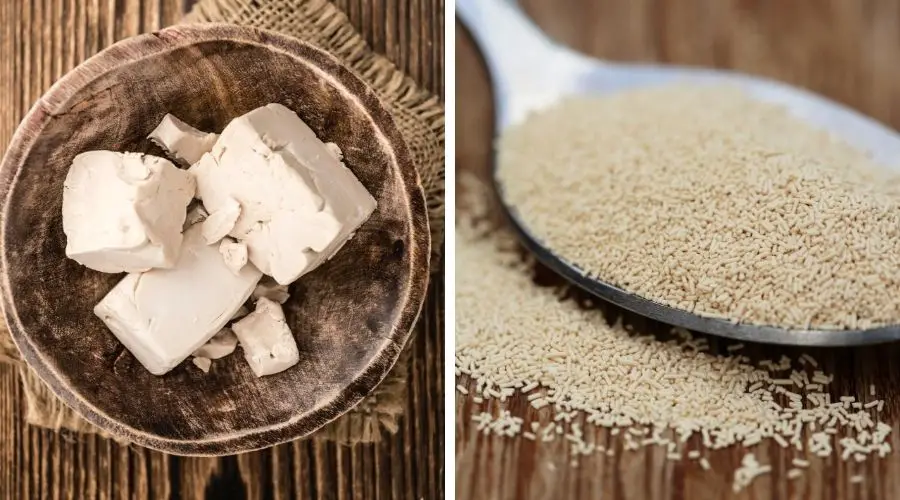
  • 7g dried yeast (15g fresh yeast)
  • 10g salt
  • 320ml water
  • 30g butter/oil/or lard

I’m going to start with varying levels of bread flour brands and supermarket own brands divided up into flour types, so you can find your favourite flour price in the tables below:

**At the time of writing bread flour is still limited in availability following lockdown, the flour below prices listed below are based on what is currently available and I’ve included where you can buy to save you time**

Strong white bread flour prices

BrandTypeTotal price in £Packet
weight
Price per
loaf (500g) in £
(rounded to
nearest 1p)
Lidl
(Belbake)
Basic strong
white flour
0.551.5kg0.18
TescoBasic strong
white flour
0.801.5kg26.7
TescoVery strong
Canadian flour
1.251kg0.63
TescoOrganic strong
white
1.351kg0.68
SainsburysBasic strong
white unbleached
bread flour
1.051.5kg0.35
SainsburysTaste the difference
very strong
Canadian bread
flour
1.101kg0.55
WaitroseEssential strong
white bread flour
1.201.5kg0.40
WaitroseCanadian & very
strong white bread
flour
1.801.5kg0.60
M&S at
Ocado
Organic strong white
bread flour
1.901.5kg0.63
M&S at
Ocado
Canadian
very strong white
bread flour
1.801.5kg0.60
OcadoStrong white
bread flour
1.101.5kg0.55
Allinson
Basic strong
white flour
2.00
(Tesco)
1.5kg0.67
Doves FarmOrganic strong white
flour
2.00
(Sainsburys)
1.5kg0.67
MarriagesFinest strong white
bread flour
1.90
(Ocado)
1.5kg0.64
HeygatesStrong white bread
flour
20.95
(Amazon)
16kg0.65
MarriagesVery strong white
Canadian bread flour
17.95
(Amazon)
5X1.5kg
=7.5kg
1.20
Wessex MillStrong white bread
flour
19.99
(Amazon)
5X1.5kg
=7.5kg
1.33
Mathews
Cotswold
flour
Strong white bread
flour
2.00
(Tesco)
1.5kg0.67

Strong wholemeal bread flour prices

BrandTypeTotal price in £Packet
weight
Price per
loaf (500g) in £
(rounded to
nearest 1p)
SainsburysTaste the difference
wholegrain seeded
flour
1.101kg0.55
WaitroseEssential strong brown
bread flour
1.001.5kg0.33
M&S OcadoCanadian
very strong wholemeal
bread flour
1.801.5kg0.6
Doves Farm
Organic strong
wholemeal bread flour
2.19
(Ocado)
1.5kg0.73
Allinson
Very strong
wholemeal
2.00
(Tesco)
1.5kg0.67
MarriagesStoneground strong
wholemeal bread flour
1.85
(Ocado)
1.5kg0.62
MarriagesOrganic stoneground strong
wholemeal bread flour
1.59
(Ocado)
1kg0.80
HeygatesCanadian & springs strong
wholemeal flour
22.98
(Amazon)
16kg0.72

Speciality bread flour prices

BrandTypeTotal price in £Packet
weight
Price per
loaf (500g) in £
(rounded to
nearest 1p)
M&S at OcadoSeeded and malted
bread flour
2.001.5kg0.67
Allinson
Country grain1.50
(Tesco)
1kg0.75
HovisMalted brown
Granary flour
2.00
(Tesco)
1kg1.00
Doves FarmOrganic
wholemeal
Spelt flour
2.50
(Tesco)
1kg1.25
Doves FarmOrganic white
Spelt flour
3.00
(Tesco)
1kg1.50
Doves FarmOrganic white
rye flour
2.00
(Tesco)
1kg1.00
Doves FarmOrganic rye
flour
2.00
(Tesco)
1kg1.00
Doves FarmMalthouse bread
flour
2.00
(Waitrose)
1kg1.00
Sharpham Park
wholegrain
Spelt flour
3.45
(Waitrose)
1kg1.73
MarriagesGolden wholegrain
bread flour
1.591kg0.80

Important Info About Choosing a Bread Flour

Although it’s good to get a bargain, when it comes to bread flour, cheap is not always the best. Here are some important things to consider when choosing bread flour:

  • Protein levels – bread flour protein levels vary and will start at anywhere from 12%, the higher the protein level the more gluten will develop creating a stronger dough.
  • Additives – by law, white bread flour should contain certain nutrients, including calcium, iron and vitamins B1 and B3 (or thiamine and niacin). Beware of anything else such as bleaching agents.

Read on to find out the cost of other ingredients used in bread.

Cost of yeast

BrandTypeTotal costWeight soldPrice per 7g (dried)
per 15g (fresh)
(unless otherwise
stated)
rounded to
nearest 1p
Alinson’sEasybake
sachets
1.00
(Ocado)
6 x 7g0.17
McDougalls
Fast action dried
yeast sachets
0.99
(Ocado)
8 x 7g0.12
Doves FarmQuick yeast1.25
(Ocado)
125g0.07
KronjastFresh yeast2.00
(Ocado)
4 x 50g0.15
TescoFast action dried
yeast sachets
0.858 x 7g0.11
Allinson’sTime saver yeast
sachets
0.52 x 11g0.25 (per 11g as
directed)
Allinson’sDried active
baking yeast (tin)
1.00125g0.06
SainsburysFast action dried yeast
sachets
0.908 x 7g0.11
Allinson’sEasybake yeast (tin)1.10100g0.08
BiorealOrganic Fresh Yeast1.20 plus 1.20
postage
2.40
(Bakery bits)
Per 42g (you
can buy
more for same
postage)
0.86 (reducing in
volume)
Image of dried and fresh yeast products

Cost of added fat (optional)

Some bread recipes include fat such as olive oil, butter and lard, the table below gives an average price of each:

Fat typeAverage supermarket
own brand price per 100g
Average supermarket
own brand price per 30g
rounded to nearest 1p
Butter0.60 (based on 1.50 per pack)0.20
Olive oil0.700.21
Lard0.200.06

Cost of added milk (optional)

Average milk price (based on a 4-pint pack of supermarket milk) per 100ml
0.05

Cost of salt

Based on standard table salt cost per 10g
0.01 (rounding up and being very generous)

Electricity cost to bake a loaf of bread

I’m not going to pretend that I know anything about watts or kilowatts, but thanks to the NPower website, I’ve found out that the average oven costs around 14p per hour to run. This is an average figure and it really depends on how energy efficient your oven is and how much your energy provider charges per unit of electricity.

It doesn’t state at what temperature and bread does bake at a higher temperature, so to be on the safe side I’m assuming:

Cost per loaf based on a cooking time of around half an hour
0.08

So, is it cheaper to make your own bread?

We now have all the figures to work out how much it costs to make a loaf of bread, based on various brands and budgets.

Below is an example of how you can use the figures to work out the cost of homemade bread based on your recipe (assuming water is free) for this example I’m using the recipe at the top of this page:

Ingredient/
budget
500g flourPriceYeastPriceSaltButterpowerTotal cost
per loaf
CheapestLidl Belbake
strong
white
bread flour
0.18Allinsons
dried
active
0.060.010.200.080.53
Good mid-
range
Matthews
Cotswold
white bread
flour
0.67Allinsons
dried
active
0.060.010.200.081.02
Good mid-
range
Marriages
Stoneground
wholemeal
bread flour
0.62Tesco
Dried
fast-
acting
0.110.010.200.081.02
Higher endDoves Farm
Organic
White Spelt
flour
1.50Tesco
Dried
fast-
acting
0.110.010.200.081.90

This tells us that yes, it is cheaper to make your own bread, especially when you look at what you can produce at home in relation to what you can buy in the shops. It is possible to make a large crusty flavoursome loaf at home for as little as 33p using basic bread-making ingredients.

The only cost equivalents which available to buy are the most basic and poor quality supermarket loaves, which cannot be compared to what you can make for the same cost. Most basic supermarket own-brand loaves cost around 50p per loaf.

The downside of making your own bread is the time it takes, but this is only a downside if you view it in that way, bread-making can be a relaxing and cheap hobby which is also very rewarding.

When I make a loaf of bread, my family can’t get enough and it’s usually all gone that same day and the best thing is, I know exactly what’s gone into it.

TIP: Not sure if you have all the necessary bread baking equipment at home? Check out my recommended picks below (Amazon links):

Making bread using Belbake flour from Lidl – the results

I made a loaf using the cheapest ingredients I could buy at the time, these ingredients included:

  • Lidl strong white bread flour
  • Allinson’s dried active yeast
  • Butter
  • Basic table salt
  • Tap water

The ingredient cost for this loaf was 53p, and I could have made it cheaper again by leaving out the butter which means I could have made this loaf for 33p – but I just like to use a bit of butter for texture and because it makes the loaf stay fresher for longer.

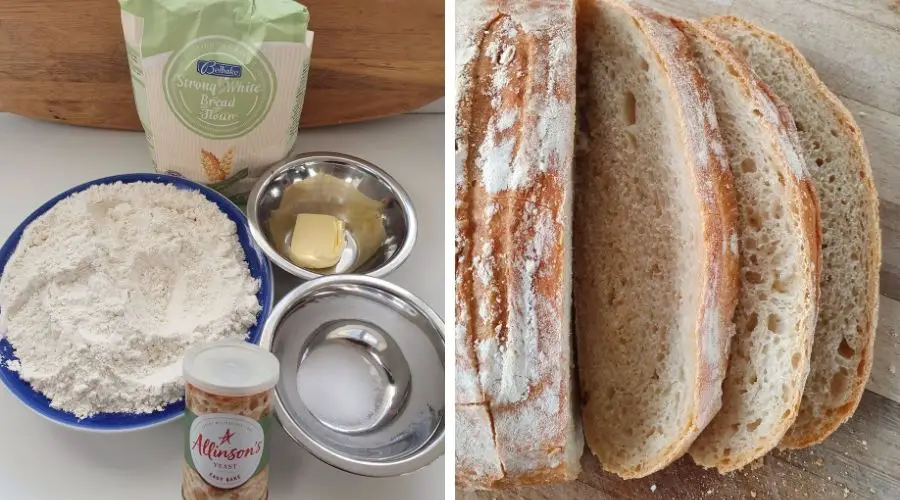
The image below shows the ingredients used and the final loaf.

Image of bread made with Belbake Lidl bread flour

There are a few things to be aware of when you’re using a budget flour such as this one. While it’s good that you can make a homemade loaf for as little as 33p, I probably wouldn’t recommend this flour to use for baking.

The final outcome was ok, but just ok, it tasted good, but I had to put quite a bit of work into getting this result and it didn’t work anywhere near as well as my usual bread flours. Here are the reasons why I wouldn’t recommend this flour:

  • It contains less than 12% protein – a good performing bread flour contains over 12% and I wouldn’t choose less than this.
  • The lack of protein is covered up by the addition of rising agents which you won’t find in a good quality flour.
  • It took so long to get a good rise that I had to leave it in the fridge overnight – but this did help to create a really good flavour.

Because I was struggling with rise, I added steam to the oven which helped a little, so this along with the overnight rise helped with the final result. But for me, too much effort versus reward and I’d rather spend a bit extra on a higher quality flour.

Is it worth spending more on bread flour

It is worth spending more on a good brand of bread flour where you see better results for the following reasons:

  • Higher quality flours are less likely to contain additives and many use organically grown grains.
  • Good milling techniques produce higher quality flour and for wholemeal, some use traditional stoneground methods.
  • You will see better performance with most high-quality bread flours.
  • Good quality bread flour generally has a higher protein level – you can see this in the nutrients section on the pack.

One of my go-to bread flour brands for white bread flour is Matthews of Cotswold, the total cost of a loaf using this flour (with fat) is £1.02. For me, this is completely worth it because I can’t buy any bread in a shop for this price which is anywhere near this quality.

A decent similar shop-bought bread is generally around double the price to buy and some artisan bread shops charge £3 or £4 for a loaf or even more.

Other ways you can save money by baking bread at home

So we found out that making bread at home is cheaper than anything you can buy of the same quality in supermarkets. There are a few ways which you can make even more savings, these include:

  • Bake more than one loaf or bread type at a time and freeze what you don’t need, find out more about freezing and batch baking bread here.
  • Consider making sourdough using a homemade sourdough starter instead of using yeast.
  • Make bread using artisan methods in it’s purest form to save on ingredients such as fat and milk.
  • Buy bread flour in bulk or at wholesale prices – works well if you want to make a lot of bread and you have space to store the flour.

You might also like…

I hope this article will help you to work out the true cost of homemade bread, give a few flour types a try and experiment to see what results you can achieve with home baking.

You might also find the following posts helpful:

Best bread flour (available in the UK)

Bread Making Tips For Beginners –  Everything You Need to Know